Utilities for creating a multiboot flash drive. Creating a multiboot USB drive using the WinSetupFromUSB utility
All the best!
Quite often you need to burn some kind of ISO disk image to a flash drive, for example, when installing Windows, when creating an emergency flash drive, for, hard drive etc.
Moreover, the same installation of Windows from a CD/DVD takes longer (and they fail more often than flash drives). Not to mention the fact that not every new PC/laptop has a disk drive installed. That is why using a flash drive is preferable (and more universal - it can be connected to any PC with a USB port).
In this article, I will look at a couple of programs that can easily and quickly burn any disk image in ISO format to a USB flash drive.
Note: ISO is the most popular disk image format. It distributes more than half of all kinds of images that can be found on the Internet.
Burning an ISO image to a USB flash drive
Method No. 1 - PowerISO
![]()
PowerISO is a very powerful program for working with ISO images. Allows you to open them, edit them, extract files from them, add files to ISO images, compress them, burn them to CD/DVD disks and flash drives, etc. Also in PowerISO you can make an image of any of your disks, test it, get a checksum (to assess whether the file is broken...).
In general, how to write an image to a flash drive using PowerISO.
1) The first thing you do is open the image. To do this, click the button "Open", or open the file menu, and then specify the image file. You can also use keystrokes Ctrl+O.

2) If the image was opened and the program did not issue any warnings, go to the menu "Tools". Select a feature such as "Create a bootable USB drive" (see arrows in the screenshot below).

3) In some cases, the program will ask you to give it administrator rights. We just agree: the program will restart and you will continue the recording process.

4) In the recording settings window, you need to:
- in the column "USB drive" indicate your flash drive (Caution! Do not mix up the letters, because during the recording process, all data on the flash drive will be deleted;
- burning method: if you are burning a bootable ISO image, select the burning method "USB - HDD"(for example, for recording images from Windows);
- the file system column can be left as default;
- next click "Start";
- By the way, please note that at the bottom of the window there are links to instructions (several links, depending on the image being recorded).

5) The program will warn you again that all data on the selected flash drive will be deleted!

- loading your computer with extraneous tasks (I recommend turning off everything unnecessary: by at least, torrents, games, video editors, etc. programs that heavily load the PC);
- size of the recorded image;
- speed of the USB drive and the flash drive itself.
7) If the recording went well and without errors: you will see a message "USB drive writing completed successfully" , as in the screenshot below.

Method number 2 - UltraISO
![]()
UltraISO is the most famous program for working with ISO images. It can do almost everything with them like the first one: open, mount, edit and modify, burn bootable flash drives, external hard drives, CD/DVD drives, etc.
It is as easy to use as the first one. Both, by the way, fully support the Russian language.
And so, let's start working in UltraISO
1) First, download (link above), install and run the program. There is nothing special to comment here, except for one thing - run the program as an administrator (otherwise the option to write a USB flash drive may not be available!).
Note! To run as administrator: just click on the UltraISO program icon and select “Run as administrator” in the context menu, as shown in the screenshot below.


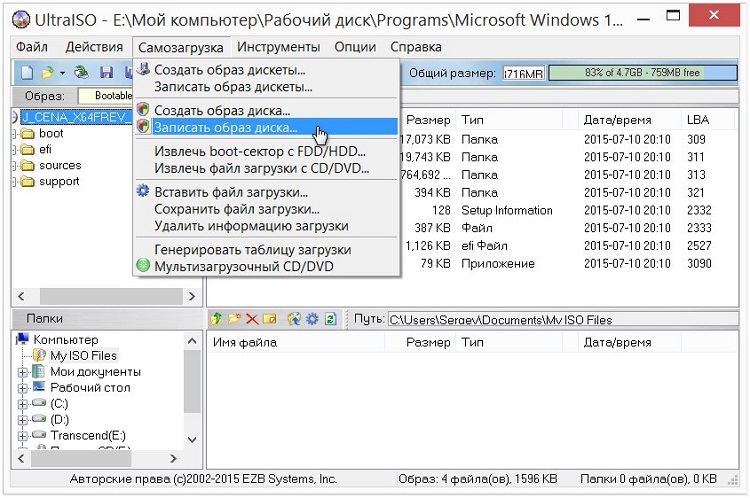
3) If the image has opened, open the "" menu (see screenshot below).

4) Then you need to set the recording settings:
- disk drive: select the letter of your flash drive (the data on it will be deleted, so be careful and attentive!)
- recording method: either USB-HDD+ or USB-HDD (this is for writing bootable media, which is what is required in most cases) . It’s quite difficult to say specifically what to choose; in most cases, USB-HDD+ works - but if suddenly your BIOS version does not see it, rewrite the flash drive in USB-HDD mode;
- then click the button "Record" .

Note! In normal mode, UltraISO automatically formats the media into the FAT32 file system (even if the flash drive was previously NTFS). In order for NTFS to remain, you need to select ExpressBoot, then click on ExpressWrite. Bottom line: when you unpack the image onto a flash drive, the file system will remain unchanged.

6) If everything went well, you will see the following message in the program message: "Cache synchronization. Writing complete!" . Please note that there are no errors in the list of program messages, otherwise your boot image will simply give an error when installing Windows 👌.
An example of a successful recording is shown in the screenshot below.

Hello dear readers or first time guests, today we will talk about how to burn an image to a flash drive, namely ISO and IMG formats using portable programs. Which will do everything for you, you just need to choose the image itself!
How to easily burn an image to a flash drive
First we will talk about the popular ISO image, which is now used almost everywhere, especially its popularity on the Internet. To do this, download the program:
The program is free and portable, i.e. does not require installation, which is very convenient. You can tolerate it and it is from which very often. We launch it and see this window: 
If you want to burn the image to a blank flash drive, then .
Now I’ll explain how to write:
1. Select that this is a disk image, i.e. our flash drive.
2 Select the image itself.
3. We indicate that this is not a hard drive, but a flash drive.
4. You may have another flash drive inserted, so we’ll find out which one it is.
5. Click OK and after a while the recording will be completed successfully.
This the best program for burning an image to a flash drive, which I found.

Once completed, a reboot is not necessary. Press exit. During the recording process, the program may offer to overwrite the file. Click yes.
How to burn an IMG image to a USB flash drive
Open it and see a simple interface:

1. Select an image (There should be no Russian characters in the path, otherwise the program may swear).
2. Select the device (Before recording, it is advisable to format the device where you are going to record the image).
3. Click White and the image will be recorded.
Now all that remains is to store these programs and do writing an image to a flash drive, or a link to my site, and you shouldn’t have such a problem.
To create a bootable flash drive, we will use programs from both a third-party manufacturer and the built-in Windows command interpreter. Each method is different and has its own specifics, but I think that a simple end user will be able to cope with creating a bootable flash drive using any of the proposed methods:
- how to make a bootable USB flash drive using the command line
- how to make a bootable USB flash drive using UltraISO
- how to make a bootable USB flash drive using Windows7 USB/DVD Download Tool
If you are interested in information about creating a bootable USB flash drive for the Linux operating system family, then you can read the information at this link “bootable USB flash drive for Linux”.
So, I propose to start creating a bootable flash drive in order, as defined in the above list, accordingly we proceed to the first method.
BOOT FLASH DRIVE using the command line (method I)
Next, we will use only those commands that we need when creating a bootable flash drive. Therefore, the figure below shows the sequential entry of commands to create a bootable USB flash drive. And please pay attention to the fact that the commands you enter are indicated by a red underline!
Graphical representation of command input on the command line
Now let's describe the previously entered commands:
DISKPART- launch the program, a text-mode command interpreter that allows you to manage objects (disks, partitions or volumes) using scripts or directly entering commands from the command line.
list disk- display a list of disk drives connected to a personal computer.
select disk 1- select disk number “1”, since in our case it is a removable flash drive.
clean- clears all data from removable media - flash drive.
create partition primary- create a primary partition.
select partition 1- select the created section.
active- make the section active.
format fs=NTFS- format the flash drive in the NTFS file system.
assign letter=T- if necessary, you can assign a letter for the flash drive in this way.
Exit- exit the DISKPART program.
BOOTABLE FLASH DRIVE CREATED!
NOTE: Once you have created a bootable USB flash drive, you need to transfer the operating system files to this removable media. Files must be transferred in unpacked form, do not under any circumstances simply add an operating system image, for example one *.ISO file, it WILL NOT WORK!!!
You can see the complete list of Diskpart program commands in the following table:
Table of commands of the "DISKPART" program
| TEAM | EXPLANATION |
| ACTIVE | - Mark the selected section as active. |
| ADD | - Adding a mirror to a simple volume. |
| ASSIGN | - Assign a name or mount point to the selected volume. |
| ATTRIBUTES | - Working with volume or disk attributes. |
| ATTACH | - Attaches a virtual disk file. |
| AUTOMOUNT | - Enable and disable automatic connection base volumes. |
| BREAK | - Splitting the mirror set. |
| CLEAN | - Clear configuration information or all data on the disk. |
| COMPACT | - Attempts to reduce the physical size of the file. |
| CONVERT | - Convert disk formats. |
| CREATE | - Create a volume, partition or virtual disk. |
| DELETE | - Delete an object. |
| DETAIL | - View object parameters. |
| DETACH | - Detaches the virtual disk file. |
| EXIT | - Shutdown DiskPart. |
| EXTEND | - Expand volume. |
| EXPAND | - Increasing the maximum available space on the virtual disk. |
| FILESYSTEMS | - Displays the current and supported file systems for the volume. |
| FORMAT | - Formatting a given volume or partition. |
| GPT | - Assigning attributes to the selected GPT partition. |
| HELP | - Display a list of commands. |
| IMPORT | - Import a disk group. |
| INACTIVE | - Marking the selected section as inactive. |
| LIST | - Display a list of objects. |
| MERGE | - Merging a child disk with its parents. |
| ONLINE | - Transferring an object marked as "offline" to the "online" state. |
| OFFLINE | - Transferring an object marked as “online” to the “offline” state. |
| RECOVER | - Update the status of all disks of the selected package. Attempting to rebuild disks of the wrong package and resynchronizing mirrored and RAID5 volumes with outdated plex or parity data. |
| R.E.M. | - Does not perform any actions. Used to comment scripts. |
| REMOVE | - Deleting a drive name or mount point. |
| REPAIR | - Recovering a RAID-5 volume with a failed member. |
| RESCAN | - Search for disks and volumes on your computer. |
| RETAIN | - Placing a service partition on a simple volume. |
| SAN | - Display or set the SAN policy for the currently loaded OS. |
| SELECT | - Setting focus on an object. |
| SETID | - Changing the partition type. |
| SHRINK | - Reduce the size of the selected volume. |
| UNIQUEID | - Display or set the GUID Partition Table (GPT) code or Master Boot Record (MBR) signature of the disk. |
BOOT FLASH DRIVE using the UltraISO program (II method)
The UltraISO program is designed for creating and editing disk images. When creating a bootable flash drive, we will use the built-in functions of this program.
Open the program with administrator rights, as shown in the figure:


Select the required operating system image to create a bootable USB flash drive, for example, the Windows Vista disk image is selected here:


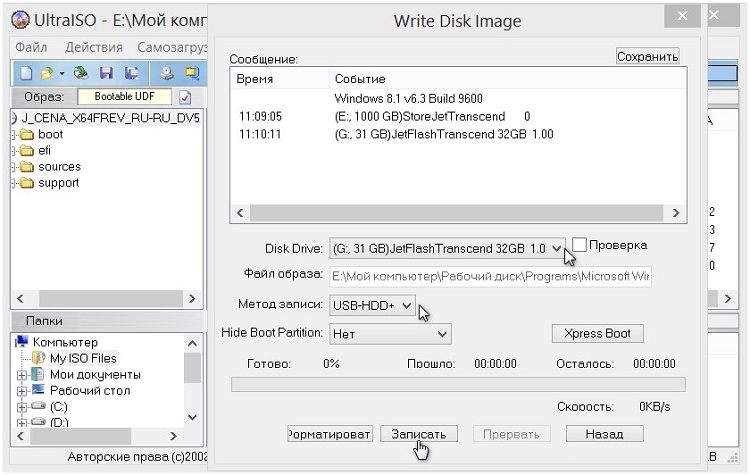
A pop-up window appears where you need to make sure that the removable media, the image file to be recorded and the recording method are correctly specified (it must be set in USB-HDD+ mode) and click the “burn” button

After clicking the "Write" button, a "Hint" window will appear, prompting you to erase all information on the flash drive. Agree!

Then the data will be written to the flash drive...

And finally, after a certain time, the operating system image will be written to a newly created bootable USB flash drive for future installation.

BOOTABLE FLASH DRIVE IS MADE!
NOTE: Do not forget to set the BIOS input/output system to boot the primary device, that is, make sure that the computer boots from removable media - the bootable flash drive you created.
BOOT FLASH DRIVE using Windows7 USB/DVD Download Tool (III method)
The Windows7 USB/DVD Download Tool program created by Microsoft for burning operating system disk images to optical and removable media. When creating a bootable flash drive, we will sequentially follow all the instructions of the program.
First you need to download this program from the official Microsoft website. Then you need to install the program following the installer's instructions. After installing the program, a shortcut will appear on the desktop, as shown in the figure:
Run it with "Administrator rights", right-click on the shortcut and click on the line "Run as administrator". The program will start, click the "Browse" button and select the operating system image *.ISO

After you have selected the image of the system to be recorded, click “Next”, another window will appear where you will be asked to select the type of media - optical or removable. Since we have a removable storage device - a flash drive, select "USB device"

We select our removable media from the proposed list, i.e. flash drive and press the "Begin copying" button

After clicking the above button, the process of formatting the flash drive will begin...

After some time, the process of writing the disk image data to the flash drive will continue.

We wait some time for the image to be recorded, and eventually we will get 100%, and here we are The bootable flash drive is created!
NOTE: Do not forget to set the BIOS input/output system to boot the primary device, that is, make sure that the computer boots from removable media - the bootable flash drive you created.
The days of CDs and DVDs are a thing of the past; today operating systems are installed from USB flash drives. A user of any level will be able to install Windows on a computer if he has such a flash drive, since the process itself Windows installations not complicated.
In this material we will look at 6 programs, including official software from Microsoft, which will create an installation bootable USB drive with Windows 10 in a few minutes.
Ultra ISO
Ultra ISO is one of the most popular programs for working with ISO disk images.
UltraISO is available in both free and paid versions; you can download it from this site.
Choose "Free Trial" (free version) or "Buy Now" if you want to purchase a license.
People who often work with disk images probably have this program for burning Windows to a flash drive in their arsenal. But not everyone knows that using Ultra ISO you can quickly create a bootable USB flash drive.
The main functions also include:
- Converting various image formats to ISO;
- Editing ISO files without extracting the entire archive;
- Work in conjunction with professional software Nero Burning Room.
The UltraISO utility can create any bootable drive, regardless of what software will be installed on it. To record the operating system, you need to have a Windows image and a formatted flash drive.
Advice. Best programs for formatting are presented in this review of the softdroid.net site.
- In chapter "File" select the desired image with the operating system, open it. , we are interested in the option "Burn disc image", as shown in the screenshot.
- In the next window, make sure that in the menu "Disk Drive" Your USB flash drive is indicated, from which you will make a bootable Windows 10 flash drive. If the USB drive is not formatted, click on the corresponding button in the program menu. If everything is ready, click "Record".
In the program settings you can change the recording speed and select the desired image format. The utility can independently prepare the drive for recording.
Paid and free version
The free version of Ultra ISO is enough for all the tasks of the average user, including creating a bootable flash drive or disk with an operating system. The paid version offers advanced functionality, as well as additional utilities, for example, Easy Boot. By purchasing a license, the user gets access to deep editing of images.
The cost of the paid version is from 30 to 60 dollars.
Rufus
Rufus is one of the most popular programs for creating bootable USB flash drives.
The main advantage of Rufus over its competitors is high speed, free distribution, and simplicity. For convenience, a portable version has been created.
WinSetupFromUSB
WinSetupFromUSB- another one free program creating bootable flash drives (there is no paid version).
WinSetupFromUSB is a utility for experienced PC users. In addition to creating a standard boot drive with an operating system image, you can use a lot of settings. For example, make a multiboot USB flash drive, where there will be several Windows versions or other OS, this is precisely its main advantage over its competitors.
Among the disadvantages, it is worth highlighting the lack of Russian language and narrow focus - you can only work with ISO.
You can download it from the official website using this link.
Brief instructions for creating a bootable USB flash drive
- In the first line, select the desired drive, which will later be bootable. If the flash drive is not yet formatted, then check the box next to "Auto format it";
- For media less than 4 GB, check the box next to FAT32; for flash drives from 4 GB, NTFS is suitable;
- In chapter "Add to USB disk" You should check the box next to the OS version you are interested in and specify the path to the ISO file.
- Press “GO”;
- Done, creating a bootable Windows 10 USB flash drive is complete.

If you decide to make a multiboot USB drive, then simply check another box, for example, opposite Linux. You can read more about this in the material -
In chapter "Options" You can set parameters for a specific BIOS type.
UNetbootin
UNetbootin– this utility is primarily focused on creating bootable flash drives with various Linux distributions, but you can also make a bootable Windows 10 flash drive here. Among the features, it is worth highlighting the ability to record an image on physical media directly from the Internet, but this function will please only Linux lovers, since this OS is distributed completely free of charge. The only negative of the program is the lack of Russian language.
The UNetbootin program is distributed free of charge, there are no paid functions.
Brief instructions for creating a bootable USB flash drive
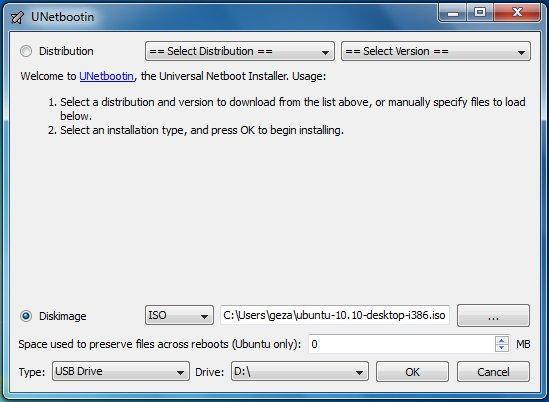
- Select the Linux distribution or image file on your computer - button “ Browse";
- Next, select the file format ( ISO is initially selected), the device type is already set to USB storage.
- Click on the “OK” button and wait for the process to complete. There is no formatting in this program, so you will have to do this step yourself.
You should choose this application if, in addition to Windows, you also work with Linux or other operating systems.
Universal USB Installer
Universal USB Installer– a free universal program for creating bootable USB flash drives.
You can download this universal utility from this link. There is no paid version.
The whole essence of the program is reflected in the name - a universal utility. You can make bootable USB flash drives with Windows and Linux. This also applies to the operation of the program itself; only owners of devices running Mac OS will not be able to use it.
There is also the ability to download the image directly from the network if we are talking about Linux. For Windows there is a standard procedure.
Among the settings, it is worth highlighting the choice of file system and formatting the drive before recording.
The disadvantages include the fact that the program does not work with version XP or lower, and the program does not have the Russian language.
Brief instructions for creating a bootable USB flash drive
- IN "Step 1" select the desired version of the OS that you plan to write to the flash drive. Windows 10 is at the very bottom;

- Next, indicate the location of the file on your hard drive or other media;
- All that remains is to indicate the flash drive to write to and click "Create". The system will also prompt you to format the drive before starting recording.
Suitable for people who often work with both Windows and Linux. If you need a simple free program that does not require installation, then Universal USB Installer is a good choice.
Windows 10 Installation Media Creation Tool
Media Creation Tool- This official means creating installation media for Windows 10.
No parameters, no additional functions - this is the main advantage of the utility, especially for novice users.
That's all for today, for now!
Hello site! Tell how to create a multiboot flash drive containing several operating systems and other programs I need. I read your article and created such a flash drive, everything works, thank you, but it would be great to add additional useful software to this flash drive, for example:
Several free anti-virus disks Dr.Web® LiveCD, ESET NOD32 LiveCD, Kaspersky Rescue Disk,
AntiWinLocker disk (removing a banner blocking the desktop)
Victoria program for fixing errors and bad blocks on your hard drive.
Acronis True Image 2014 - creating a backup of the operating system.
Acronis Disk Director - divide your hard drive into partitions.
Resuscitation disk for Windows XP - ERD Commander 5.0, resuscitation disk for Windows 7 - (MSDaRT) 7.0 and for Windows 8 (MSDaRT) 8.0.
A free Linux operating system, such as Ubuntu.
So that, if necessary, I can boot a computer or laptop from such a flash drive and not only install Windows XP, Windows 7 and Windows 8, but also install the free Linux operating system, check the computer for viruses, remove the desktop blocker banner if necessary, fix bad problems on your hard drive, repair Windows XP, Windows 7 and Windows 8.
I have a 16 GB flash drive, I think there’s enough space for all this stuff! Honestly, I have never seen such multiboot flash drives, but I would really like to have one. Regards, Mikhail.
How to create a multiboot flash drive containing several operating systems and other programs
You can create such a flash drive, friends, and it’s not at all difficult! We will use the updated WinSetupFromUSB program that uses the Grub4dos bootloader, which is capable of booting your computer or laptop from a flash drive loaded with several operating systems of different bit sizes (32 bit and 64 bit) and various software. This flash drive is very convenient and will undoubtedly come in handy for a person who is passionate about computers. After creating such a multiboot flash drive and, if necessary, deploy it to another flash drive.
For me personally, such a flash drive is important and simply irreplaceable in my computer affairs.

We need a clean flash drive; in the end it will turn into a multiboot one and will contain everything listed below:
Note: All operating systems and software used as an example in my article, I purchased it quite legally on the official websites of the developers. Friends, use only licensed software.
Operating systems: Windows XP, Windows 7 and Windows 8.
Anti-virus rescue disks Dr.Web LiveCD, ESET NOD32 LiveCD, Kaspersky Rescue Disk. You can download them using the links:
Dr.Web LiveCD http://www.freedrweb.com/livecd/

ESET NOD32 LiveCD https://www.esetnod32.ru/download/utilities/livecd/

Kaspersky Rescue Disk http://www.kaspersky.ru/virus-scanner

Acronis True Image 2014 backup data. www.acronis.ru
Acronis Disk Director is a hard disk partition manager.
Recovery disks for Windows XP - ERD Commander 5.0, recovery disk Windows 7 - (MSDaRT) 7.0 and for Windows 8 (MSDaRT) 8.0
Free Linux operating system, such as Ubuntu.
Download the Victoria program for fixing errors and bad blocks on your hard drive on my cloud storage
https://cloud.mail.ru/public/9Nbd/3W9PU9ED1

AntiWinLocker recovery disk (removing a banner blocking the desktop).
First, I suggest you upload three operating systems onto a flash drive; you can do this according to our article. If you don’t need Windows XP, then use another article to create a bootable flash drive for Windows 7 and Windows 8, and then come back here and continue.
Creating a multiboot flash drive
Once you create a multiboot flash drive with the number of operating systems you need, you can then add other software to the flash drive.
Note: It doesn't really matter in what order you add things to the flash drive, for example you can add programs first and then operating systems or vice versa. If you need a multiboot flash drive containing only programs, then you can read directly from this place. If you wish, you can add any operating system to the flash drive at any time using the method shown below.
Select WinSetupFromUSB 1.3.exe (22 MB). Download and run the program.
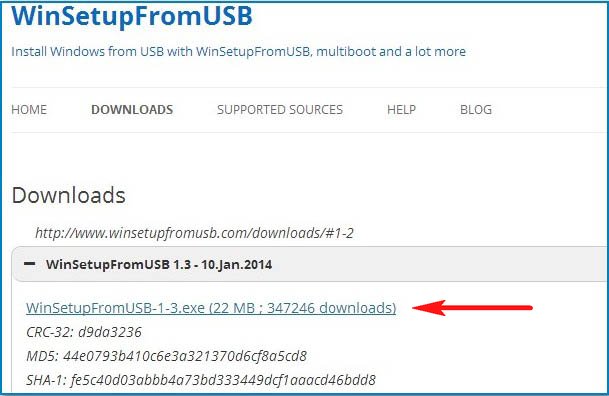
If we need to create a bootable USB flash drive for Windows 7 64 bit and Windows 8 64 bit, then we run the file WinSetupFromUSB_1-3_x64.exe.

My flash drive already has three operating systems: Windows XP, Windows 7 and Windows 8, a 16 GB flash drive is occupied by 7 GB, free space That's it, I'm adding programs.
Attention: if you ran the WinSetupFromUSB program for the first time and you have a clean flash drive, that is, you did not load operating systems or any programs onto it, then before starting work you need to format the flash drive in NTFS and make it bootable. The main window of the WinSetupFromUSB program displays the name of our connected flash drive. Check the box Auto format it with FBinst and check the NTFS box.
Check the box!

If your flash drive is already bootable and you, for example, loaded operating systems onto it using the WinSetupFromUSB program, which means we don’t check the Auto format it with FBinst option and go straight to the item Linux ISO/Other Grub4dos compatible ISO and click on the button on the right,

An explorer window opens, in which I find my folder with images of operating systems and programs.
First of all, let's add the ESET NOD32 LiveCD antivirus disk to our multiboot flash drive,
I select it with the left mouse and click Open.


There is a short process of adding the program to our multiboot disk.


Then we add each ISO image we have in exactly the same way.
Let's try to boot from this bootable flash drive for fun and look at the boot menu of the flash drive.
If you need to install an operating system, select
0 Windows NT6 (Vista/7 and above) Setup- means installation of operating systems Windows Vista, Windows 7 and higher. Press Enter.
1 Second part/continue setup (Boot first internal disk)- boot from hard drive
As you can see, the antivirus disk from Eset NOD32 has been added to the boot menu under

In the next window, select the operating system we need to install: Windows 7 SP 1 x64 or Windows 8 x64.

Well, with programs it’s even simpler; in the multiboot menu, select any program you need and press Enter. For example, you choose to download an antivirus disk from Eset NOD32 №2 eset_sysrescue from partition 0, then the antivirus program will load.


To make everything more clear, let's add a few more programs to our multiboot flash drive.
Adding the Dr.Web LiveCD antivirus disk
In the WinSetupFromUSB program, check the box Linux ISO/Other Grub4dos compatible ISO and click on the button on the right,
Explorer will open, select the image of the Dr.Web LiveCD anti-virus disk


The process of adding a program to our multiboot disk

The program has been transferred to a multiboot flash drive.
We boot from the flash drive, we see that the Dr.Web LiveCD anti-virus disk has been added to our multiboot flash drive. Let's check its work.

